
FAQ XolidoSign
Shipments by lot
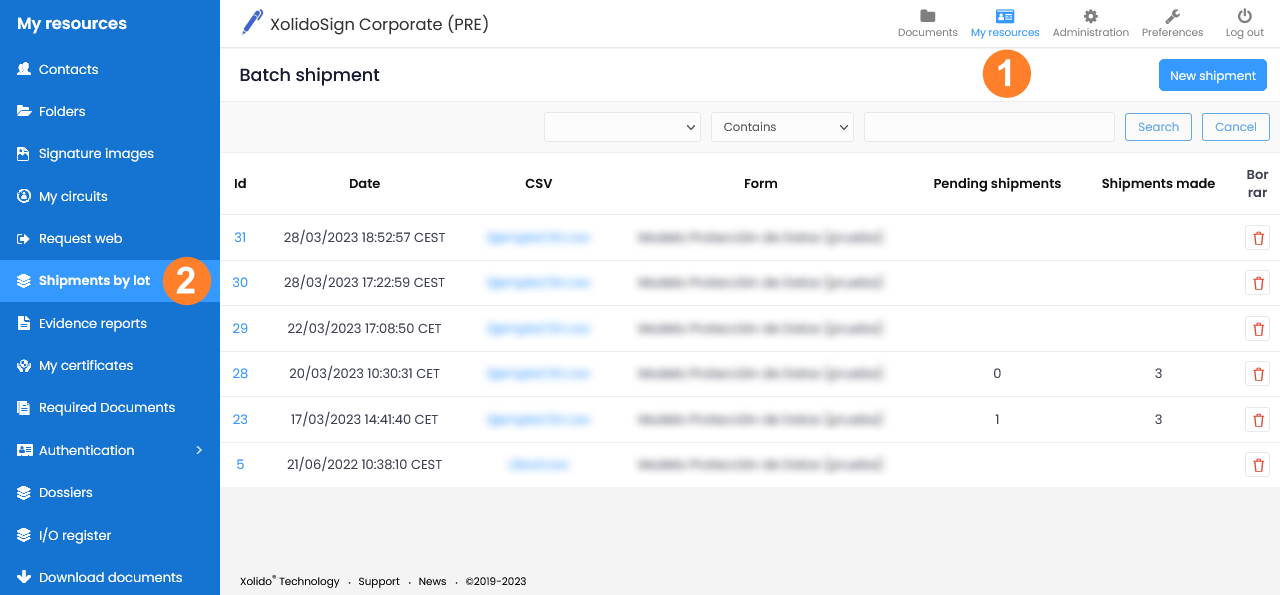
1. The "Shipments by lot" functionality will allow us to send a PDF document to be signed individually by multiple recipients.
2. It will also allow us to customize the document for each signer.
3. To do this we are going to use a .csv file that will import both the recipients' data and the PDF fields that we want to customize. In this way each signatory will receive their personalized document.
To use this option we must have the document to be sent as a "Template / Model".
To have a file in .csv format we can use Excel or Libre Office Calc.
.csv file

Fields for sending

Fields to customize PDF document
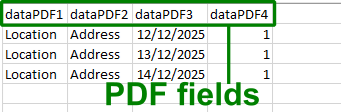
Configuration of .CSV file with personalized document for each signatory
The first row of the .csv file must have the necessary fields for sending and some optional fields that will allow us to customize the PDF document to be sent to each signatory.
Fields for sending:
- Identifier: NIF, VAT, RUT, ... of the addressee. To be used for authentication with electronic certificate. If the signatory has this type of authentication, the certificate to be used must contain the NIF indicated here.
- Email: of the recipient. It will be used to send the communication or the access pin when it is sent by email.
- Mobile prefix: mobile prefix of the recipient's country.
- Mobile: cell phone number. It will be used to send the communication or the access pin when sent by SMS.
- Shipment method: email or sms.
- Authentication: type of access to access the document.
- Pin email: when access to the sent document requires authentication by pin sent to email. The possible values are: 0 -> no email pin required. 1 -> requires pin email.
- Pin SMS: when access to the sent document requires authentication by pin sent by SMS. The possible values are: 0 -> does not require SMS pin. 1 -> requires SMS pin.
- Pin Telegram: when access to the sent document requires authentication by telegram pin. The possible values are: 0 -> no Telegram pin required. 1 -> requires Telegram pin.
- Language: language to be used for communication.
Fields to customize the PDF document to each signer:
In this case it will depend on the data to be customized. As an example, they can be:
- Name
- VAT
- City
- Date
- Etc.
The data included in "Fields for sending" can also be used to customize the PDF document.
To facilitate the configuration of the CSV file you can download a sample CSV file.
In the example shown, the first row of the .csv file is split in two:
-Red box contains the fields to configure the sending.
-Green box contains the fields to customize the PDF document.
*The titles of the fields can be modified, they do not have to be the ones indicated in the example.
Finally, if we use Excel we save the file as .CSV (comma delimited)(*.csv).
If we use Libre Office Calc we save the file as CSV Text (*.csv) with the field delimiter ;

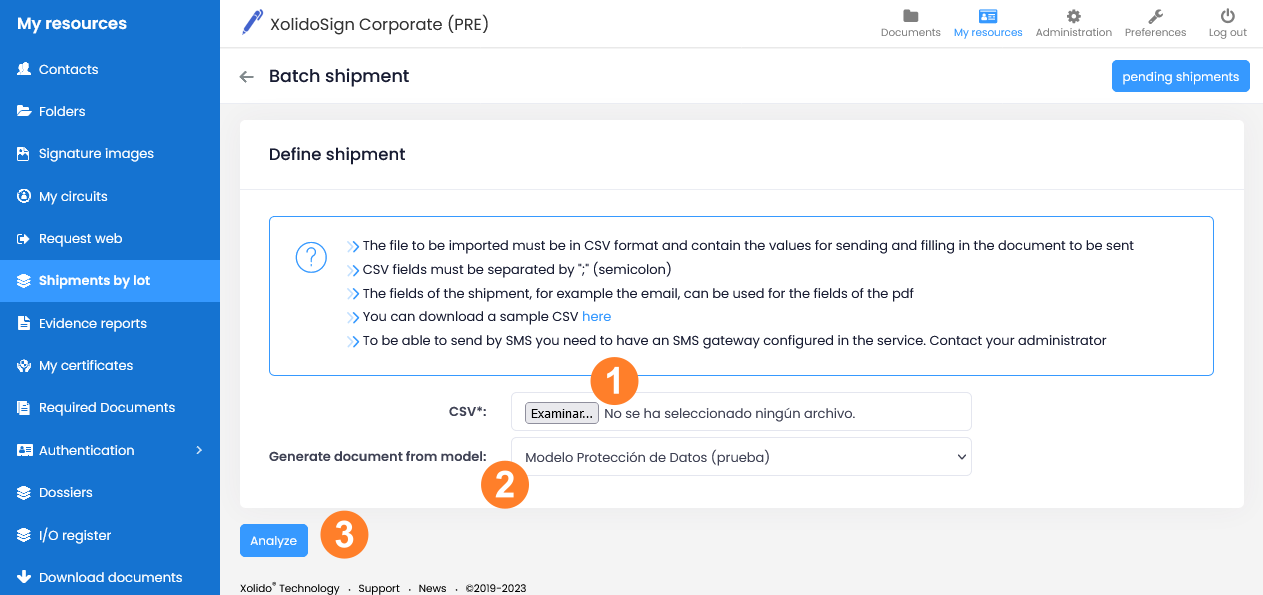
How to send in Batch
Once we have the .CSV created, we click on My Resources > Batch Submissions.
In the "Shipments by Batch" page we click on "New shipment" and follow the next steps:
1. Click on "Examinar" to select the .csv file.
2. Select the model to be sent in batches.
3. Click on "Analyze".
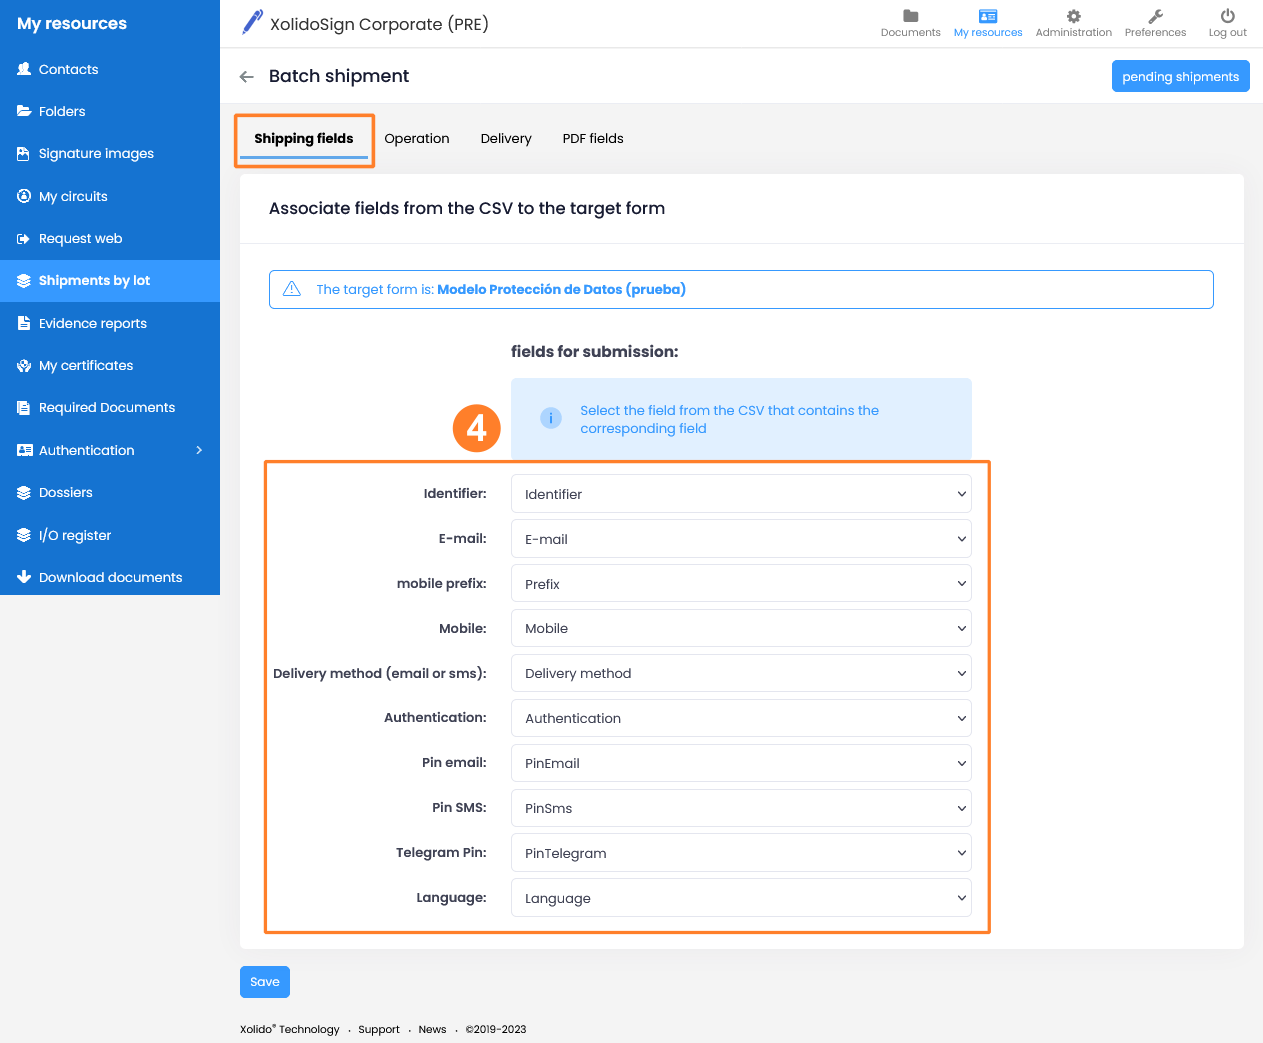
4. Next, we configure the sending fields by associating the displayed fields with those of the .csv file. Following the example of creation of the .csv file, the fields association would look like this:
- Identifier > NIF
- Email > Email
- Mobile prefix > Mobile prefix
- Mobile > Mobile
- Shipping method (email or sms) > Shipping method
- Authentication > Type of access
- Pin email > PinEmail
- Pin SMS > PinSms
- Pin Telegram > PinTelegram
- Language > Language
5. Click on "Save".
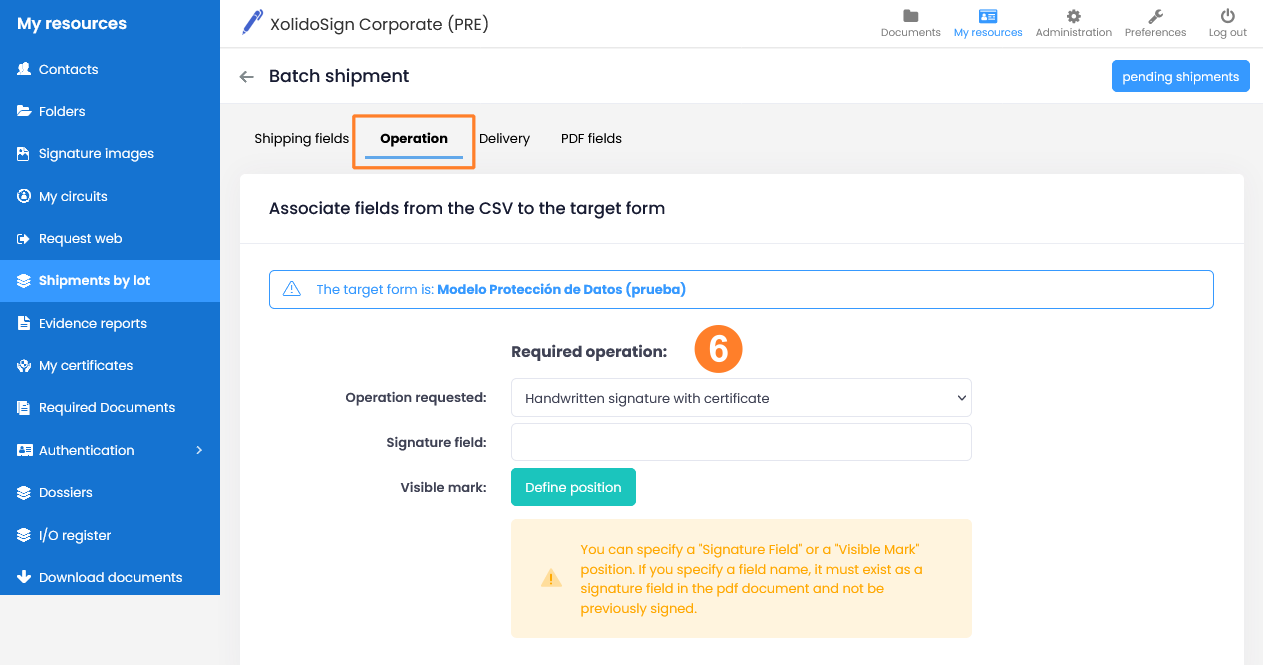
6. In the "Operation" tab, we select the type of operation that will be required from the recipients (signature, approval, notification, etc.). If the operation to be requested is signature or approval with a visible mark, we can configure the position of the mark.
7. Click on "Save".
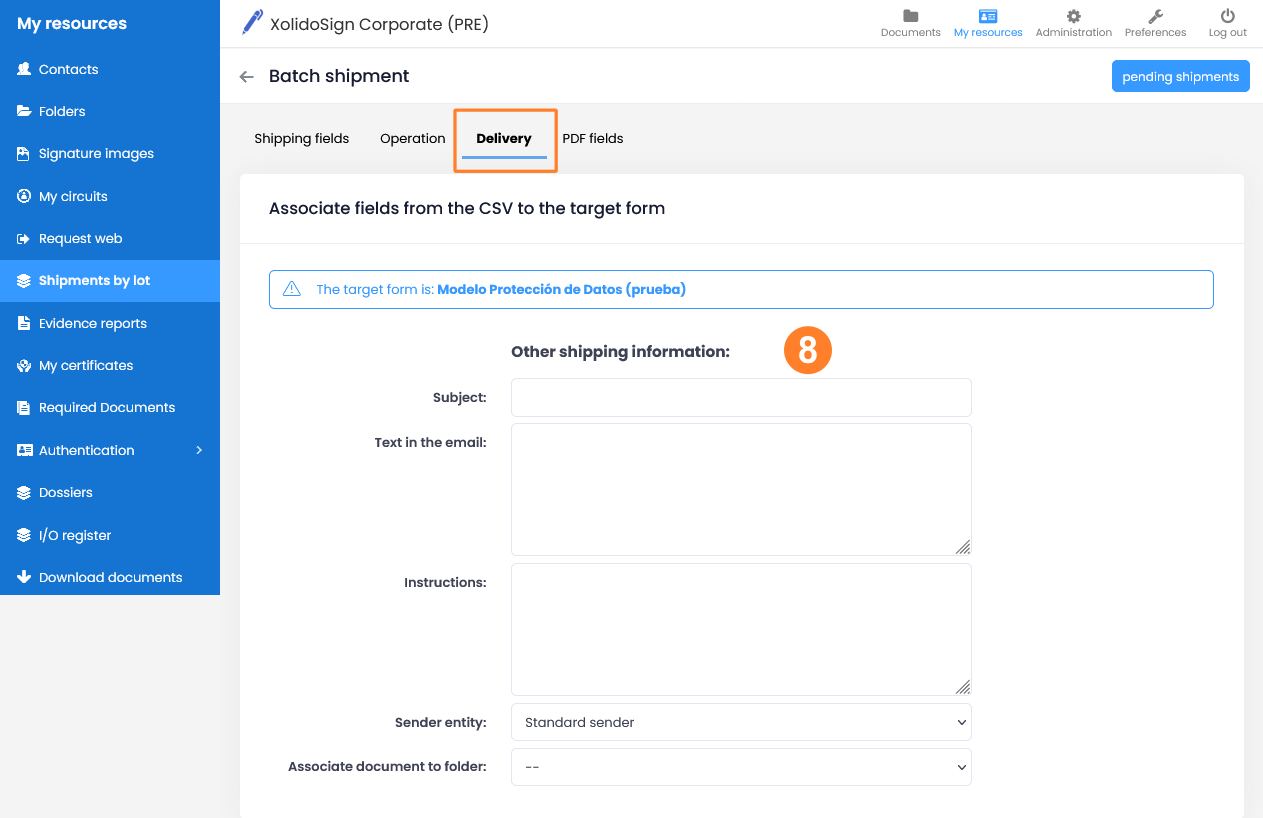
8. In the "Sending" tab, we configure the subject and text of the email, the Sender Entity (if we have more than one) and we can also associate the documents generated to a certain folder.
9. Click on "Save".
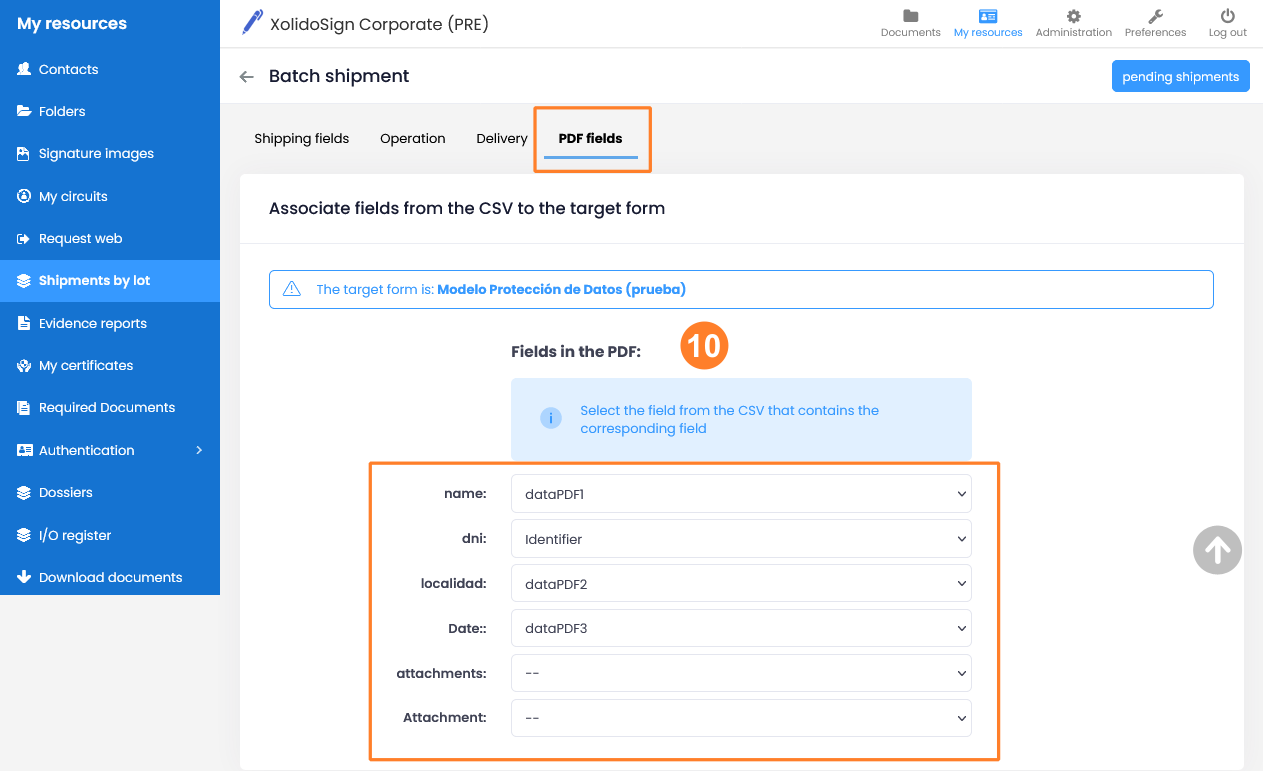
10. In the "PDF Fields" tab, we associate the fields of the PDF document that we are going to send with the fields of the .csv file. These fields will be used to customize each document sent to each recipient.
11. Click on "Save".
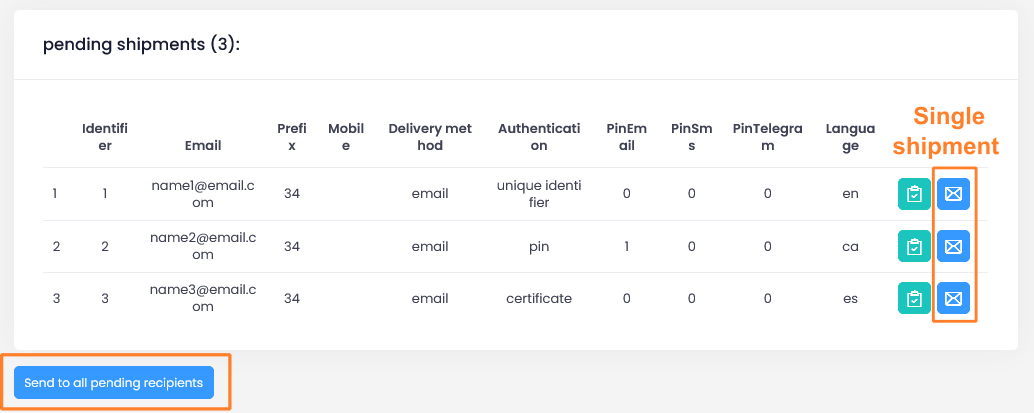
Now that we have configured the Batch Shipment, we can send the shipment by clicking on the "Send to all pending recipients" button.
We are also given the option to send to each recipient individually by clicking on the envelope icon that appears on each recipient line.
Each one of these shipments will appear in the Documents tray from where we can follow the status of each one of them.
XolidoSign Solutions

Xolido products
IT infrastructure and cloud services
About us